
The Bonafide Curator platform is a critical tool designed to help BRANDs collect, verify, and maintain accurate, granular information for consumption by Large Language Models (LLMs). This process ensures the content is aligned with the BRAND voice and maximizes visibility and influence in the generative AI e-commerce channel.
This guide focuses on the Marketing Manager role, emphasizing workflow management, prioritization (Strategy A: Feature Type first), and the delegation of tasks.
Related Articles:
What is Curator and Why it Matters?
|
Curator Overview for Destinations
|
Curator Overview for Hotels
|
Bonafide Curator Training Guide: Marketing Manager Workflow
Section 1: Introduction and Access
-
Log In and Access the Module
Access the Curator module, which is available via the link found in the left menu.
Left Menu > Select the Hourglass Icon (under the word “Curation”).
.png?width=670&height=324&name=image-20251126-164108%20(1).png)
|
Understand the Curation Overview The initial screen displays a horizontal bar graph overview representing the verification status of your data. This view provides a quick snapshot of your BRAND’s performance. Initial screen upon login. 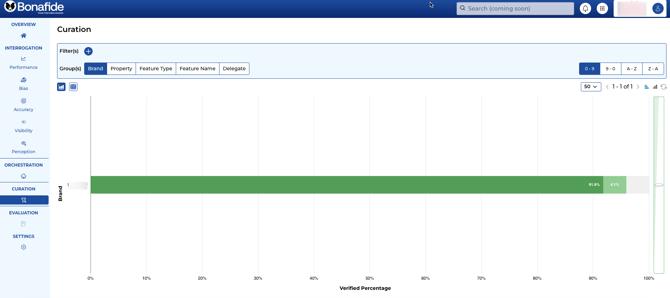
|
|
Define Verification Statuses Review the color-coded status indicators. Mousing over the segments displays the numeric count and percentage:• Dark Green: Indicates questions confirmed and verified by a human.• Light Green (System of Record): Answers derived when the Bonafide crawl examined the BRAND website but are not yet verified by a human.• Gray (Unverified): Questions where an answer was not found and requires human input and verification.In one example, there were 701 total questions, with 144 (20.5%) reflecting unverified questions.
Mouse over the bar segments to see the numeric count and percentage (e.g., 12.1% verified, 67.3% system of record, 20.5% unverified). .png?width=670&height=348&name=image-20251126-164637%20(1).png)
|
Section 2: Setting Up the Workspace (Detail View)
|
Switch to Detailed Curation View Move from the graphical overview to the Detailed View, which is similar to a Microsoft Excel or Google Sheets spreadsheet. Each row is an individual record reflecting an individual prompt. Upper Left Corner > Click the Detail Icon (the icon resembling an Excel sheet next to the Graph icon). .png?width=670&height=336&name=image-20251126-164613%20(1).png)
|
|
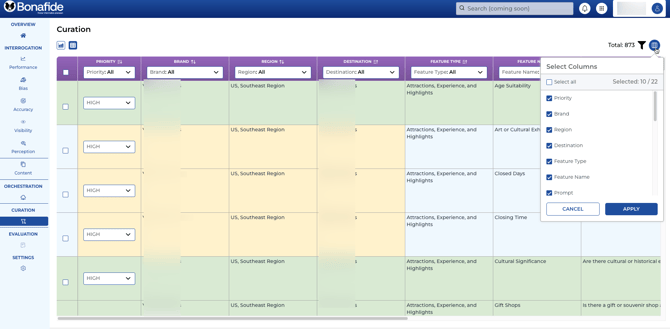
Customize Column Visibility Use the Column Selector to refine your view, focusing on the data needed for curation and prioritization.
Upper Right Corner > Click the Blue Column Selector Icon > Deselect unnecessary columns such as
|
.png?width=670&height=300&name=image-20251201-194245%20(1).png)
|
Adjust Column Widths Increase visibility by adjusting column widths, particularly for the Official Response column, to easily review the full text. Mouse over the vertical bar between column headings > Click and drag the vertical split option to adjust width. %20(1).gif?width=670&height=297&name=2025-12-01_13-44-13%20(1)%20(1).gif)
|
Section 3: Prioritization Strategy (Managerial Focus: Strategy A)
This is the recommended strategy for managers as the fastest approach to addressing the biggest data gaps (gray/unverified questions).
|
Identify Gaps using Feature Type Groups Return to the Bar Graph view and navigate to the Feature Type groups to visually identify categories with the highest rate of gray (Unverified) responses. There are 13 different feature types available. Upper Left Corner > Click the Bar Graph Icon > Select Feature Types from the display groups. .png?width=670&height=287&name=image-20251201-200047%20(1).png)
|
|
Filter by Feature Type (Strategy A, Part 1) Click on the Feature Type identified as having the largest gap (e.g., Food, Dining, and Cuisine). Then select Filter to isolate this subset of questions. Feature Type Bar > Click > Select Filter. .png?width=670&height=294&name=image-20251201-200240%20(2).png)
|
|
Filter by Unverified Status (Strategy A, Part 2) Switch back to the Detail View. Filter the questions further to show only those requiring immediate human input. Verified Column > Click Dropdown Arrow > Select Unverified > Click OK. This action can distill the list significantly (e.g., from 35 questions to only 14 unverified prompts in that feature type). %20(1).gif?width=670&height=305&name=2025-12-01_14-03-52%20(1)%20(1).gif)
|
Clear Filters
Always clear all filters when switching prioritization tasks.
Upper Right Corner > Click the Black Funnel Icon ("Remove Filters").
%20(1).gif?width=670&height=297&name=2025-12-01_14-06-08%20(1)%20(1).gif)
Section 4: Core Curation and Verification (The Two-Step Process)
The Official Response is the reservoir of data. It is recommended to over-answer the prompts and provide thorough, complete, contextual, embellished answers because LLMs thrive on large amounts of context.
|
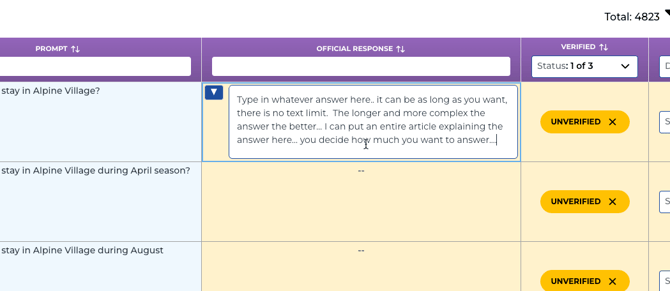
Update the Official Response (Step 1) Double-click into the Official Response cell to open the free text box. Enter a robust, contextual answer. You may optionally insert a Reference URL if citing a specific financial or informational sub-site (e.g., a map of ATMs or banks). Hit Enter to save the Official Response. Double-click the target cell in the Official Response column. 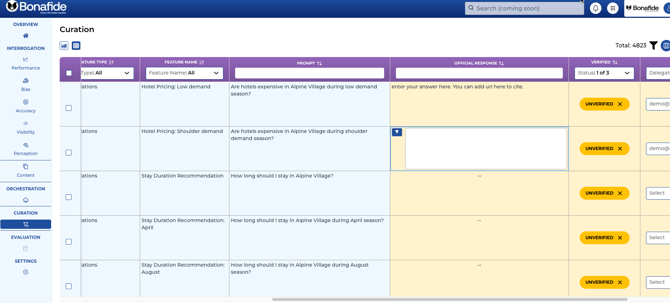
|
Two Options Update Official Response:
OPTION 1
Utilize LLM Templates to help you create a response. Bonafide has collected the major LLMs response for that prompt for you. You have the option of choosing which of the LLM response you would adopt as your own. It is important to read each LLM response to make sure it is accurate before adopting them.
|
Utilize LLM Templates (Optional Baseline) This option can be chosen if you are not a content manager or writer. You can choose to have the LLMs assist you in the answer by simply choosing which LLM response is correct and simply adopting what they say. You can even tweak the LLM response or add to it if you like. To start with a good baseline response rather than writing from scratch, leverage responses gathered by Bonafide from various LLMs. Official Response cell (while open) > Upper Left Corner > Click the Blue Box with White Drop-down Arrow (Select Template). 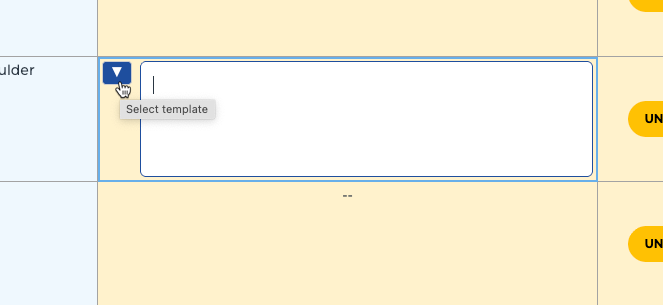
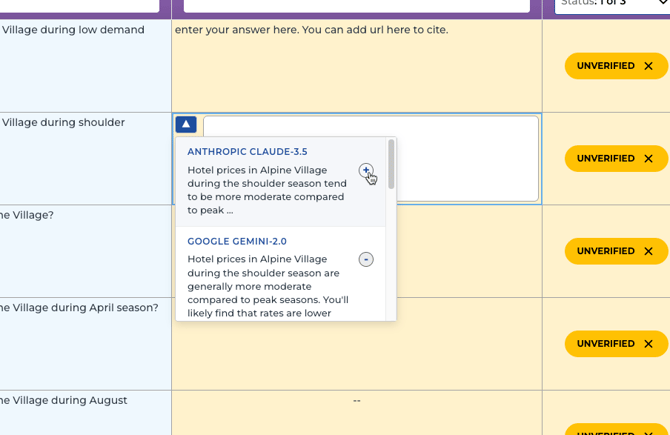
Select an LLM Template Click the plus symbol next to an LLM to expand the record and view the full text response. Click the text of the desired LLM response to instantly populate it into the Official Response cell. Inside Select Template box > 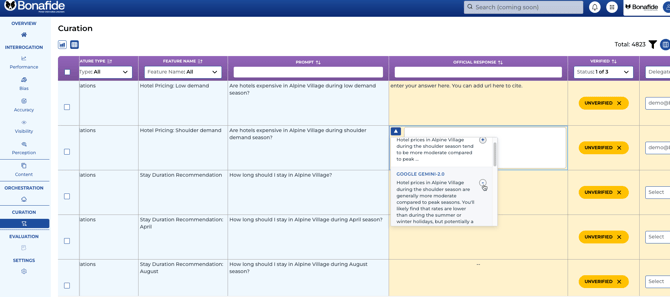
> Click Plus Symbol (to expand and see the full response) .png?width=670&height=329&name=image-20251216-151013%20(1).png)
> Click the response text to adopt it. (The LLMs response you adopted populates the Official Response box) .png?width=670&height=560&name=image-20251216-151041%20(1).png)
Hit ENTER then CLICK on status to change to VERIFIED 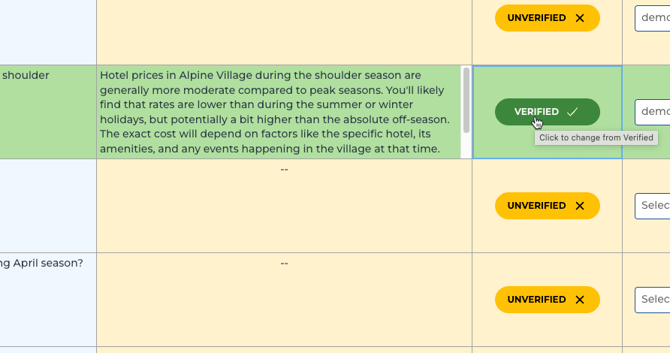
|
ALTERNATIVE OPTION 1: See LLM Responses Side by Side Instead
|
Enable LLM Comparison Columns to View them Side by Side Enable columns to view responses from multiple LLMs side-by-side with your Official Response for easy comparison.
Upper Right Corner > Click the Blue Column Selector Icon > Scroll to the bottom > Select desired LLMs (e.g., Gemini, Perplexity, Chat GPT) > Click Apply. 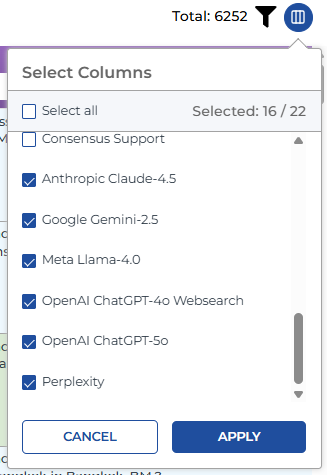 LLM columns selected.
Review and Adopt LLM Responses The scroll bar expands, allowing you to scroll right to see the LLM responses side-by-side. Review the different responses from each LLM. Scroll Right to view LLM columns. You may copy text from an LLM column, edit it externally (e.g., in a notepad), and manually paste it back into the Official Response cell. 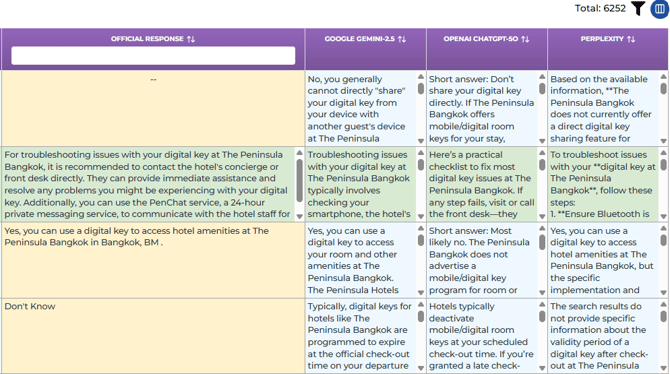 Official Response (No response found on website, Response found on website, LLM consensus answer, LLMs did not know answer) with LLM responses.
|
OPTION 2
If you are a content manager or a writer, this is the option for you. You can copy and paste from another source a pre-prepared answer or simply start entering the answer. Don’t worry too much about misspellings or grammar. The LLMs will respond back to the user in the correct spelling and grammar.
NOTE: Official Response is simply the cell/source where the LLMs will find the answer to the prompt. It will not parrot the exact wording of what you write but instead, pick out the answer it needs from the text you write.
|
Update the Official Response with Your Own Messaging and Voice… Double-click into the Official Response cell to open the free text box. Enter a robust, contextual answer. You may optionally insert a Reference URL if citing a specific financial or informational sub-site (e.g., a map of ATMs or banks). Hit Enter to save the Official Response. Double-click the target cell in the Official Response column.
|
Section 6: Delegation (Managerial Oversight)
Delegation is a mechanism for assigning specific questions and records to individuals across the organization to distribute workload, recognizing that knowledge is distributed.
|
Select Prompts for Delegation Prompts can be selected individually or in bulk using the checkboxes on the far left. Scroll Left > Checkbox on the far left of each row to select individual records. To select all viewed records in the filter sequence, click the checkbox in the upper left purple corner. 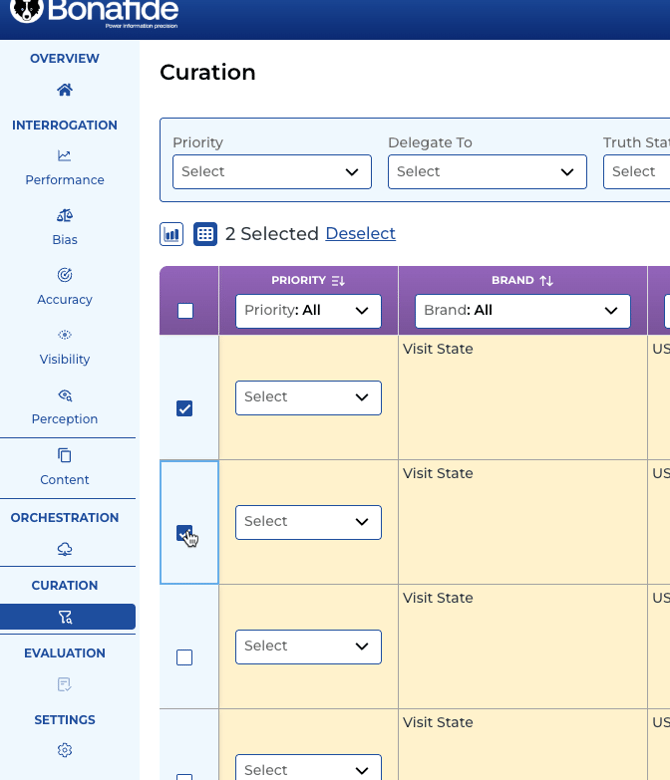 Click on check box to select individually
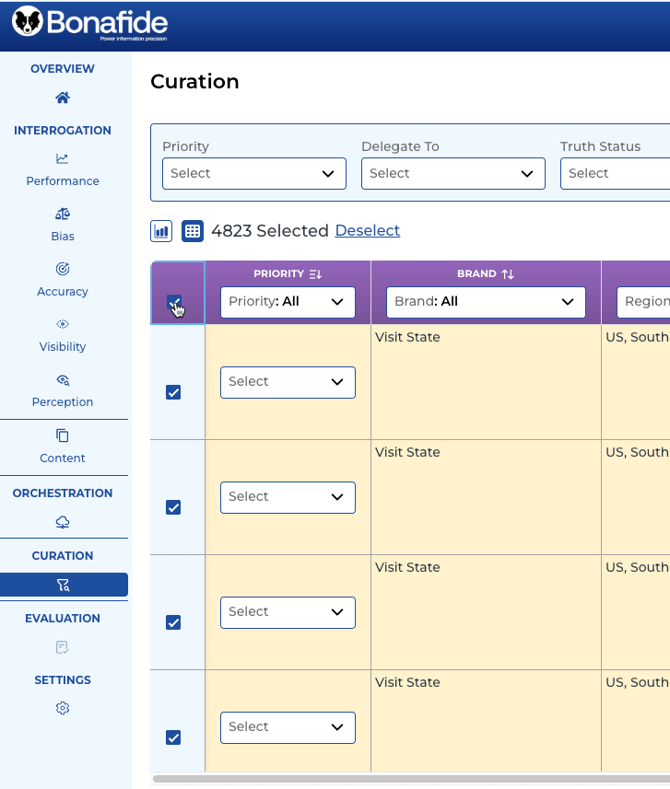 Bulk Select
Assign Prompts using Bulk Delegation Once questions are selected, the Delegation options appear above the table. Top Menu (above table) > Select Delegate to Dropdown. 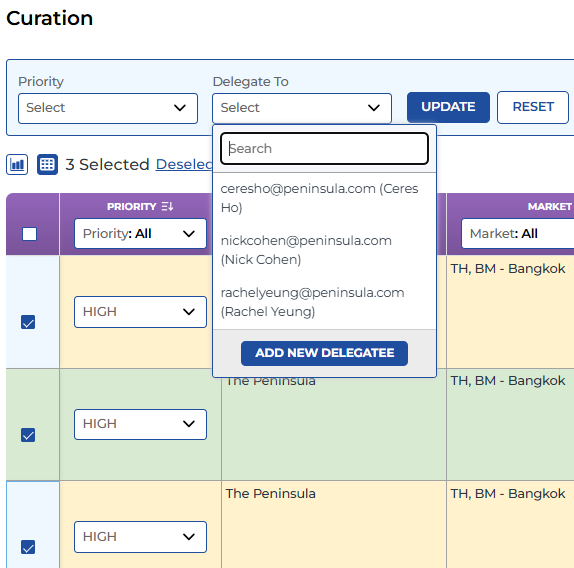
Select or Add a Delegate Choose an existing delegate or select Add new delegate. New delegates require a first name, last name, and email (title and organization are optional). Delegate to Dropdown > Select name (e.g., "Delegate Test User") or Add new delegate. 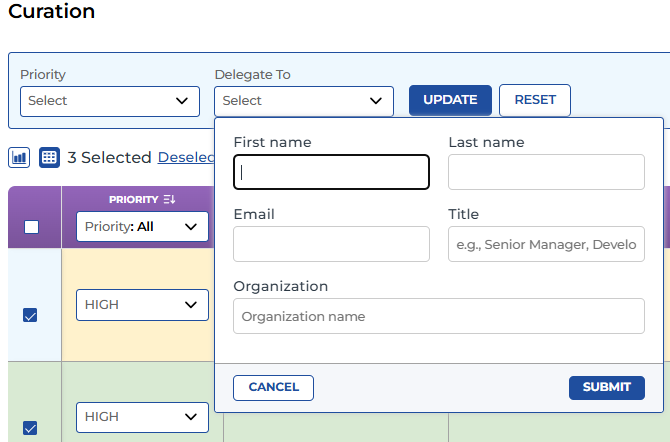
Finalize Delegation Select the Update button. This action systematically generates an email, creates a login for the delegate (if new), and sets up their restricted view containing only the assigned prompts. Select the Update button. 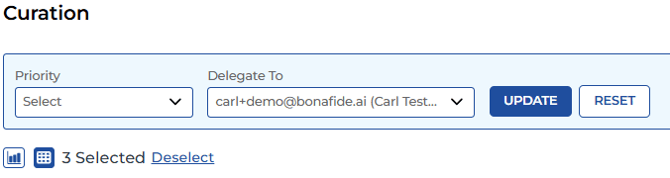
|
Analogy for Curation:
Curation is like managing a Brand's authoritative digital library. The Official Response is not just the book title; it is the entire text, annotated and contextualized, making it an invaluable resource. When LLMs (the researchers) are asked a question about your BRAND, they are far more likely to cite and reference the most detailed and robust information available in your library (the embellished Official Response) rather than relying on thin or unverified summaries. Your job is to ensure every shelf (Feature Type) is audited and stocked, prioritizing the emptiest shelves (Unverified/Gray areas).